I got a little snippet of the some of my work out in the wild. It’s an iPhone vid the li’l Lady shot at a House Arrest gig in Santa Barbara the other night. She missed the intro, but it sounds OK. Anyway, I’m playing the orange Uno I built earlier this year and it’s loaded with the Funktronic Sidewinder and my 3-band preamp. The backline was a Fender Bassman 1200 Pro and an SVT cab with an indeterminate number of blown speakers. The Fender Bassman controls were confusing at best, but I think I managed to get a fairly representative tone out of it. I’d bust out the big speakers; the bass is pretty sub-sonic. Hope you enjoy.
R&D – Sorry for the Mess!

Research and development – my desk has been a real mess! I’m finalizing my bass sidewinder revamp. I built 6 new versions along with a whole new preamp design. I should have the new version of the pickup singled out and built early this week. I got the new circuit boards in a few days ago.
Stay tuned for more updates! I can’t wait to clean off my desk!
New Preamp and Pickup Wind
OK I’m just going to post a weekly update – no pix today.
I’ve been working on the pickup and preamp. Using my new cardboard bobbins I wound a couple of coils with 44awg wire and increased the wind count. I after casting them I mocked up a pickup with the new ceramic 8 cores. From there, I rebuilt my preamp using a James tone stack instead of the Big Muff/Tilt tone stack.
Two things:
1) On one of the cast bobbins, I somehow didn’t add enough hardener to the epoxy resin. I think that’s a pitfall that comes with mixing tiny 10ml quantities – if you’re off by just a tiny bit, that turns out to be a lot. Anyway, the piece didn’t cure and came out kind of rubbery. It’s good enough for testing, but not for a finished pickup. In the process of experimenting with various ways to build and cast my modular coils, I used all the pre-cut cardboard flatwork (I only ordered 14 pc to start). I ordered some more – it should be on its way soon.
2) I changed the preamp to a James/Baxandall tone stack because while the one-knob preamp was kinda cute, there just wasn’t any real control over the tone. Once you added any treble, you started to cut bass and vice-versa. With the James/Baxandall I’m able to fine tune the amount of highs and lows. I was even able to fine-tune the circuit itself by bumping 400Hz up by about 2dB. I also upped it to 18v much more headroom.
I know I’ve said this before, but this new pickup and preamp combo is a huge improvement. Keep in mind, pickup design is kind of a long process of experimentation that isn’t all that straightforward. In any case, the C8/44awg sidewinder rendered a much more controlled-sounding pickup. No more crazy high mids from the neos and with the ceramics wrapped in all that stainless steel, the biting highs are in the right place – nicely placed on top of a big cushion of clear lows and warm mids. With the neo versions, I felt like I was always struggling to contain this beastly pickup with these upper mids that just didn’t want to behave. Now I can really dig in to the strings without having to worry about it topping out.
I think it’s possible to design a really good-sounding neodymium pickup. I don’t know that the sidewinder design is the best application. I think maybe a more conventional humbucker with a steel core and the magnets placed on the bottom of the pickup might be a better approach with the neos. That keep the super strong neos away from the strings would make the magnets have to permeate all the way through the steel core. I dunno, just theorizing.
Pickup All Glued Up and Ready for Cleanup

I managed to epoxy the pickup pieces together last night. It came out OK. Once I clean it up a bit, it’ll be fine.
As far as my pickup assembly, I just took all the loose parts and glued them together. I didn’t get a chance to take many photos photos because it wasn’t exactly and orderly process. The dog ears didn’t fit as well as they did in the dry run, and one of them was slightly askew. I’ll be able to sand it in such a way that it will work, and most of the problem spots will be inside the guitar and won’t be visible anyway.
One thing I’d really like to do is eliminate the process of gluing the blades and coils together. I’m thinking if I put a little groove on those nubs on the sides of my coils, I might be able to make the dog ear serve as a snap-together part and use spacers to set those pieces apart. I don’t have the machining capabilities for something that refined, but it’s something to think about. I have to really fine tune all the parts so that they all fit together and ensure that they are straight and parallel.

Gluing the baseplate to the bottom of the pickup wasn’t bad at all. Everything seemed to survive OK. I could easily make that process easier by making a simple jig to hold the baseplate in place with the rest of the pickup. I attached a photo showing my wire terminals. I have hole behind them where I’m hoping to attach a ground wire. I stuck a piece of copper tape that stretches across the blades.
Overall, I’m happy enough with this as a prototype for my neodymium sidewinder design. However, I’m torn; there’s a lot I would like to do to refine and perfect this design and perhaps make it more of a production piece but I would also like to move on and build a bass and put this pickup in it. In addition, I’m also starting to come up with more pickup designs that I’d like to start working on as well. In conclusion, I’m at a point where I have take a few minutes to relax an do some prioritizing. Refining this design is pretty high on the list, but to a certain degree I’m constrained by what I can execute using the limited tools I have at my disposal. I may have to invest in more tools or tooling to take this one to the next step. In the meantime, now that I have a working prototype in my hands, I can get back on track and start cutting some wood.
Neodymium Sidewinder Bass Pickup Progress – Pieces Cut and Partially Assembled
I didn’t want to jump the gun and reveal my progress with this pickup build too early, but at this point I have more than a year into this design and after today, this felt pretty good. Besides, I prolly won’t get to the ears and the base until Sunday. Here’s an image of my neodymium bass sidewinder pickup:
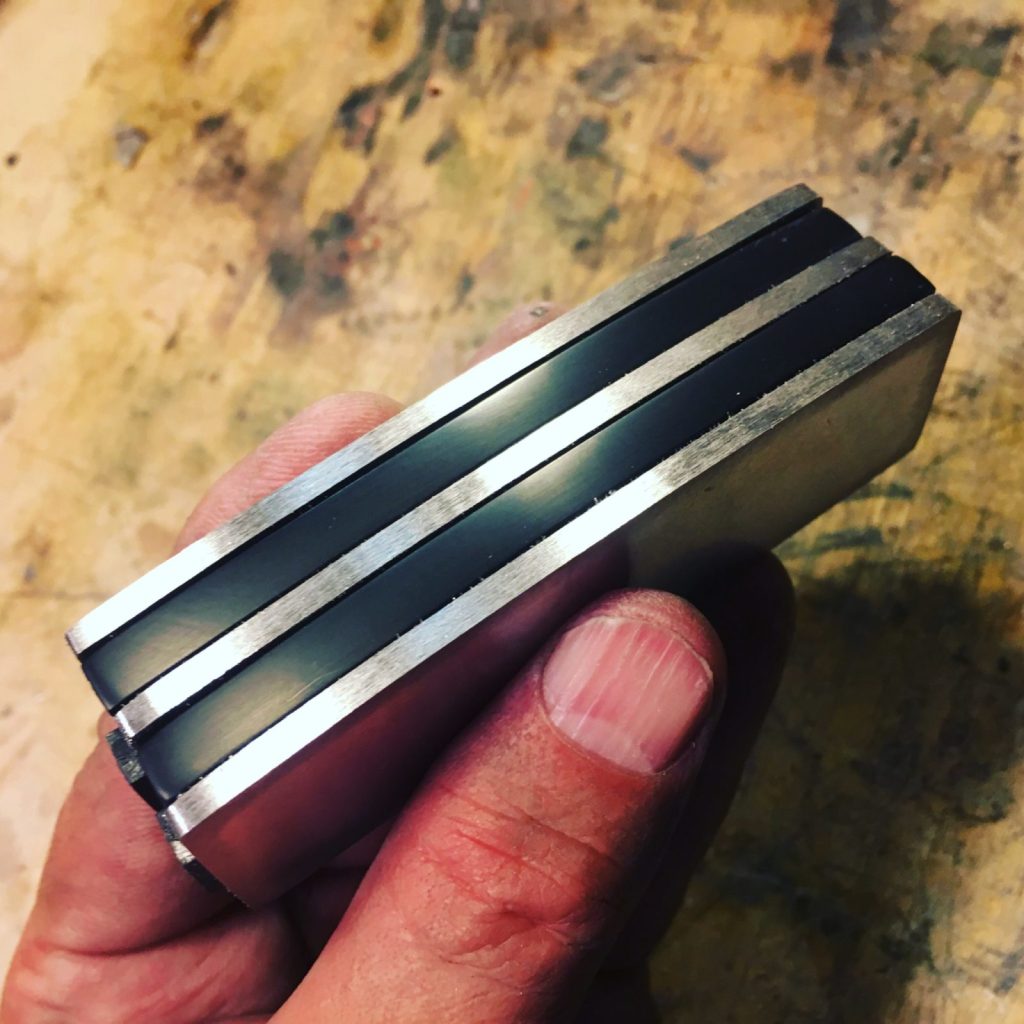
I sanded and polished the epoxy parts. I basically sanded it up to 2000 grit. It polishes OK, but I don’t know if I can get it up to a gloss. I think that’s where CA glue would come int. The bars are just roughly sanded and need sanding and polishing. I’ll get to that this weekend as well. I’m really envisioning them in chrome.
Once I cleaned up my epoxy resin cast bobbins, they looked pretty good. I’ve been talking a lot of smack about Garolite as a bobbin flange material lately, but I gotta say it worked great. It feathered right into the epoxy.

In addition to the base, my next big quandary is going to be this: I’m going to need to “pot” the space in between the coils and the bars. I left about .005″ gap on either side – not a lot, but enough to see daylight through it. There has to be some space in order to assure that the magnets are making full contact with the bars. We’ll see. Dripping the clear penetrating epoxy sealer would make kind of a mess. I don’t know if I even want to think about pouring potting wax in there.
Spin Doctor: Resin Casting the Coils for the Bass Neo Sidewinder
For this pickup, I had to come up with a way to cast a fairly narrow coil in epoxy. I had to do it in such a way so that the magnets would not be covered in resin and the bottom needed to have space for the wire terminals. What I decided to try was to make a two-part silicon mold and cast the coils without the magnets so that I could install them later.
First, I made a two-part mold. This basically involved making one cast using modeling clay as a filler. I used ball bearings as registration points.

I backed one edge all the way to the side of the box. Leaving on side open, this is where I will actually pour the epoxy into the mold. The wire terminals will be sticking out of the back. Once I poured the Smooth-On OOMMOO 30 silicone casting compound and let it set, I got this:

From which I made the other half of the mold – I’m actually making a couple of different parts here…

Once I go the completed mold, I placed the coil into the mold. I included a couple of nubs to hold it in place so that the coil is suspended in the mold while the epoxy flows underneath it. It’s tight enough so that not too much resin goes into the slug holes, but just in case, I added some registered drill marks that would be cast into the piece. This coil hasn’t had the terminals installed yet – I just placed it in there for demonstration.

Next, I pour the West Systems Epoxy. I used black Mixol as a colorant. I ended up mixing a little too much epoxy – the whole cast only used 1/2 teaspoon of material! The fixture is to keep the sides from flexing – otherwise, the epoxy will just splooch out of the sides. Note the li’l terminals sticking out of the top left corner.

And here we go!

Not too bad! First, let me disclose that there was a teeny weeny bit of resin in a couple of the holes – I just got too excited and cleaned them out before I took the picture. The sides might need a little sanding and cleanup, but they won’t be exposed, so I don’t have to worry too much about it. I will have to do some facing on the top part which will be visible. I had the casting in the mold for about 8 hours on a fairly hot and humid day, and the epoxy still seemed a tad soft. I may let it harden for another day before I start sanding the front surface.
Next up, the dog ears and base.

